How to Start an Easy Potato Bed
When we see the yellow of dandelions and daffodils, it’s almost time to start potatoes. (That’s about St. Patrick’s Day in Western North Carolina’s Zone 7.) We needed a quick way to plant that was easy enough for kids to help.
Update: This video is a few years old, and we wait a bit longer to plant in spring because of “hollow heart” — details at the end.
The process still works beautifullly though! Here’s How to Start a Quick and Easy Potato Bed thanks to a deep mulch technique:
Step 1: Put down 2-3 inches of compost.
We’re planting these potatoes right on top of a grass/clover lawn we want to convert to a garden bed. We’ll end up with a deeply mulched bed that should do a pretty good job of smothering out the existing vegetation.
If needed, remove any large weeds and/or mow the area at the lowest setting. If you’re converting a space with aggressive plants (like Bermuda grass), you could add a few layers of newspaper to give your potatoes a head start.
You can use an existing garden area, too.
(If you live in a warmer climate, you can also plant in late fall or early winter. The potatoes will start to root right away and they’ll be one of the first plants to pop up in early spring!)
Step 2: Place potatoes about 9 inches apart.
We use a wide bed and staggered rows to get more plants in a smaller space. The pattern looks like this:
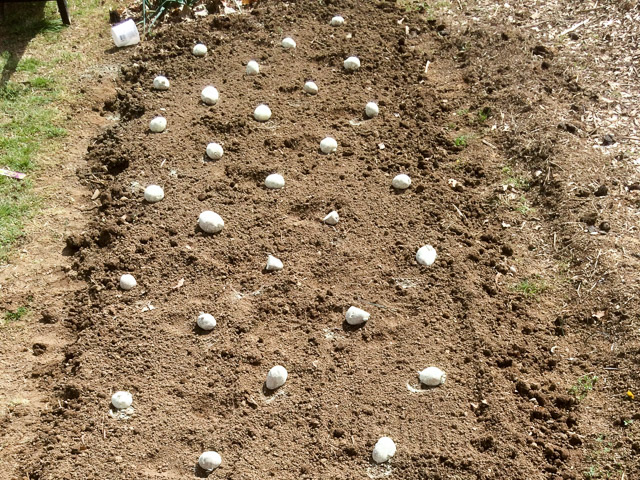
We purchase certified disease-free seed potatoes because we have had problems with blight in the past.
If your seed potatoes are fairly large, you can cut them into pieces with at least two eyes each.

Lay them out at room temperature for a few days to allow the wound to harden off, or callus. You can also dust the potatoes with agricultural sulfur to discourage fungal disease.
Step 3: Cover with 6 inches of mulch.
Use a lightweight, weed-free mulch, like shredded leaves or unsprayed straw. Spoiled hay could also work, though you may end up pulling more grassy wheat/oat plants that come along. Again, be sure to look for unsprayed to avoid the persistent herbicides sometimes used on grass crops.
This mulch method is inspired by the late great gardener and master of mulching, Ruth Stout. You can watch a great mini-documentary about her and her garden below. She plants potatoes around the 7 minute mark. It’s worth your time to have a watch. She’s delightful!
This deep mulch technique may require extra irrigation in arid climates, and you might want to include compost/soil mixed in with your mulch to hold more moisture.
If you have problems with rodents, you may want to stick with the traditional approach of planting in trenches and hilling up soil around the growing plants.
Step 4: Continue to add mulch as the potatoes grow.
The new tubers grow at the same level or just above the seed potato, so adding mulch (or hilling up soil in the more traditional approach) encourages more tuber growth. Timing matters, as if you add cover too late, you won’t see the increased yields. You want to cover the lower stems of the plant as it is in its vegetative growth stage. This diagram is a great visual explanation of the process.
Even if you’re too late for the added tuber production, the additional mulch protects the developing tubers from sunlight. (Sun exposure causes them to produce chlorophyll and turn green. Green potatoes also contain the toxic compound solanine.)
Step 5: Harvest!
You can reach into the mulch and find egg-sized potatoes when the flower buds open. Harvest and store the crop after the leaves turn yellow. For longer storage, allow the potatoes to dry/cure in a dark area before packing them, and then keep them in a cool, dark, fairly humid area. You can read more storage tips here.

Hollow Heart and Our Updated Timeline
We grew and ate lots of potatoes using this method. But we had some trouble with “hollow heart” which results in a brown/black hole in the center of the potato.
No blemishes on the outside and edible after you cut off the brown spots, but still, who wants their big beautiful potatoes with holes inside? Plus, they don’t store well!
Hollow heart can be caused by irregular watering and cold soil temps, especially early in a potato’s formation, or, as I learned from our plant pathologist friend Dr. Paul, it can be related to a boron deficiency in the soil.
We’ve added an organic seaweed-based fertilizer to our potato bed which ensures the micronutrients, like boron, are available to plants.
We also wait until April when soil temps get to about 60 degrees F to plant. (You can use a kitchen or compost thermometer to check the top few inches!)
Now, I’d love to hear from you!
In the comments below, tell me where you grow and what approaches you’ve used for potatoes. Have you tried deep mulch? What method is your favorite?
And if you have had hollow heart before, do you have any tips for avoiding it?